This is the multi-page printable view of this section.
Click here to print.
Return to the regular view of this page.
Getting Started
This tutorial will walk you through a complete Sidero setup and the formation,
scaling, and destruction of a workload cluster.
To complete this tutorial, you will need a few things:
- ISC DHCP server.
While any DHCP server will do, we will be presenting the
configuration syntax for ISC DHCP.
This is the standard DHCP server available on most Linux distributions (NOT
dnsmasq) as well as on the Ubiquiti EdgeRouter line of products.
- Machine or Virtual Machine on which to run Sidero itself.
The requirements for this machine are very low, it can be x86 or arm64
and it should have at least 4GB of RAM.
- Machines on which to run Kubernetes clusters.
These have the same minimum specifications as the Sidero machine.
- Workstation on which
talosctl, kubectl, and clusterctl can be run.
Steps
- Prerequisite: CLI tools
- Prerequisite: DHCP server
- Prerequisite: Kubernetes
- Install Sidero
- Expose services
- Import workload machines
- Create a workload cluster
- Scale the workload cluster
- Destroy the workload cluster
- Optional: Pivot management cluster
Useful Terms
ClusterAPI or CAPI is the common system for managing Kubernetes clusters
in a declarative fashion.
Management Cluster is the cluster on which Sidero itself runs.
It is generally a special-purpose Kubernetes cluster whose sole responsibility
is maintaining the CRD database of Sidero and providing the services necessary
to manage your workload Kubernetes clusters.
Sidero is the ClusterAPI-powered system which manages baremetal
infrastructure for Kubernetes.
Talos is the Kubernetes-focused Linux operating system built by the same
people who bring to you Sidero.
It is a very small, entirely API-driven OS which is meant to provide a reliable
and self-maintaining base on which Kubernetes clusters may run.
More information about Talos can be found at
https://talos.dev.
Workload Cluster is a cluster, managed by Sidero, on which your Kubernetes
workloads may be run.
The workload clusters are where you run your own applications and infrastruture.
Sidero creates them from your available resources, maintains them over time as
your needs and resources change, and removes them whenever it is told to do so.
1 - Prerequisite: CLI tools
Prerequisite: CLI tools
You will need three CLI tools installed on your workstation in order to interact
with Sidero:
kubectlclusterctltalosctl
Install kubectl
Since kubectl is the standard Kubernetes control tool, many distributions
already exist for it.
Feel free to check your own package manager to see if it is available natively.
Otherwise, you may install it directly from the main distribution point.
The main article for this can be found
here.
sudo curl -Lo /usr/local/bin/kubectl \
  "https://dl.k8s.io/release/$(\
  curl -L -s https://dl.k8s.io/release/stable.txt\
  )/bin/linux/amd64/kubectl"
sudo chmod +x /usr/local/bin/kubectl
Install clusterctl
The clusterctl tool is the standard control tool for ClusterAPI (CAPI).
It is less common, so it is also less likely to be in package managers.
The main article for installing clusterctl can be found
here.
sudo curl -Lo /usr/local/bin/clusterctl \
  "https://github.com/kubernetes-sigs/cluster-api/releases/download/v0.3.23/clusterctl-$(uname -s | tr '[:upper:]' '[:lower:]')-amd64" \
sudo chmod +x /usr/local/bin/clusterctl
Note: Sidero is currently only compatible with CAPI v1alpha3,
so versions of clusterctl above v0.3.x will not work.
Install talosctl
The talosctl tool is used to interact with the Talos (our Kubernetes-focused
operating system) API.
The latest version can be found on our
Releases page.
sudo curl -Lo /usr/local/bin/talosctl \
 "https://github.com/talos-systems/talos/releases/latest/download/talosctl-$(uname -s | tr '[:upper:]' '[:lower:]')-amd64"
chmod +x /usr/local/bin/talosctl
2 - Prerequisite: Kubernetes
Prerequisite: Kubernetes
In order to run Sidero, you first need a Kubernetes “cluster”.
There is nothing special about this cluster.
It can be, for example:
- a Kubernetes cluster you already have
- a single-node cluster running in Docker on your laptop
- a cluster running inside a virtual machine stack such as VMWare
- a Talos Kubernetes cluster running on a spare machine
Two important things are needed in this cluster:
- Kubernetes
v1.18 or later - Ability to expose tcp and udp Services to the workload cluster machines
For the purposes of this tutorial, we will create this cluster in Docker on a
workstation, perhaps a laptop.
If you already have a suitable Kubernetes cluster, feel free to skip this step.
Create a Local Management Cluster
The talosctl CLI tool has built-in support for spinning up Talos in docker containers.
Let’s use this to our advantage as an easy Kubernetes cluster to start from.
Issue the following to create a single-node Docker-based Kubernetes cluster:
export HOST_IP="192.168.1.150"

talosctl cluster create \
  --name sidero-demo \
  -p 69:69/udp,8081:8081/tcp \
  --workers 0 \
  --config-patch '[{"op": "add", "path": "/cluster/allowSchedulingOnMasters", "value": true}]' \
  --endpoint $HOST_IP
The 192.168.1.150 IP address should be changed to the IP address of your Docker
host.
This is not the Docker bridge IP but the standard IP address of the
workstation.
Note that there are two ports mentioned in the command above.
The first (69) is
for TFTP.
The second (8081) is for the web server (which serves netboot
artifacts and configuration).
Exposing them here allows us to access the services that will get deployed on this node.
In turn, we will be running our Sidero services with hostNetwork: true,
so the Docker host will forward these to the Docker container,
which will in turn be running in the same namespace as the Sidero Kubernetes components.
A full separate management cluster will likely approach this differently,
with a load balancer or a means of sharing an IP address across multiple nodes (such as with MetalLB).
Finally, the --config-patch is optional,
but since we are running a single-node cluster in this Tutorial,
adding this will allow Sidero to run on the controlplane.
Otherwise, you would need to add worker nodes to this management plane cluster to be
able to run the Sidero components on it.
Access the cluster
Once the cluster create command is complete, you can retrieve the kubeconfig for it using the Talos API:
Note: by default, Talos will merge the kubeconfig for this cluster into your
standard kubeconfig under the context name matching the cluster name your
created above.
If this name conflicts, it will be given a -1, a -2 or so
on, so it is generally safe to run.
However, if you would prefer to not modify your standard kubeconfig, you can
supply a directory name as the third parameter, which will cause a new
kubeconfig to be created there instead.
Remember that if you choose to not use the standard location, your should set
your KUBECONFIG environment variable or pass the --kubeconfig option to
tell the kubectl client the name of the kubeconfig file.
3 - Prerequisite: DHCP service
Prerequisite: DHCP Service
In order to network boot Talos, we need to set up our DHCP server to supply the
network boot parameters to our servers.
For maximum flexibility, Sidero makes use of iPXE to be able to reference
artifacts via HTTP.
Some modern servers support direct UEFI HTTP boot, but most existing servers
still rely on the old, slow TFTP-based PXE boot first.
Therefore, we need to tell our DHCP server to find the iPXE binary on a TFTP
server.
Conveniently, Sidero comes with a TFTP server which will serve the appropriate
files.
We need only set up our DHCP server to point to it.
The tricky bit is that at different phases, we need to serve different assets,
but they all use the same DHCP metadata key.
In fact, for each architecture, we have as many as four different client types:
- Legacy BIOS-based PXE boot (undionly.kpxe via TFTP)
- UEFI-based PXE boot (ipxe.efi via TFTP)
- UEFI HTTP boot (ipxe.efi via HTTP URL)
- iPXE (boot.ipxe via HTTP URL)
Common client types
If you are lucky and all of the machines in a given DHCP zone can use the same
network boot client mechanism, your DHCP server only needs to provide two
options:
Server-Name (option 66) with the IP of the Sidero TFTP serviceBootfile-Name (option 67) with the appropriate value for the boot client type:
- Legacy BIOS PXE boot:
undionly.kpxe - UEFI-based PXE boot:
ipxe.efi - UEFI HTTP boot:
http://sidero-server-url/tftp/ipxe.efi - iPXE boot:
http://sidero-server-url/boot.ipxe
In the ISC DHCP server, these options look like:
next-server 172.16.199.50;
filename "ipxe.efi";
Multiple client types
Any given server will usually use only one of those, but if you have a mix of
machines, you may need a combination of them.
In this case, you would need a way to provide different images for different
client or machine types.
Both ISC DHCP server and dnsmasq provide ways to supply such conditional responses.
In this tutorial, we are working with ISC DHCP.
For modularity, we are breaking the conditional statements into a separate file
and using the include statement to load them into the main dhcpd.conf file.
In our example below, 172.16.199.50 is the IP address of our Sidero service.
ipxe-metal.conf:
allow bootp;
allow booting;

# IP address for PXE-based TFTP methods
next-server 172.16.199.50;

# Configuration for iPXE clients
class "ipxeclient" {
  match if exists user-class and (option user-class = "iPXE");
  filename "http://172.16.199.50/boot.ipxe";
}

# Configuration for legacy BIOS-based PXE boot
class "biosclients" {
  match if not exists user-class and substring (option vendor-class-identifier, 15, 5) = "00000";
  filename "undionly.kpxe";
}

# Configuration for UEFI-based PXE boot
class "pxeclients" {
  match if not exists user-class and substring (option vendor-class-identifier, 0, 9) = "PXEClient";
  filename "ipxe.efi";
}

# Configuration for UEFI-based HTTP boot
class "httpclients" {
  match if not exists user-class and substring (option vendor-class-identifier, 0, 10) = "HTTPClient";
  option vendor-class-identifier "HTTPClient";
  filename "http://172.16.199.50/tftp/ipxe.efi";
}
Once this file is created, we can include it from our main dhcpd.conf inside a
subnet section.
shared-network sidero {
  subnet 172.16.199.0 netmask 255.255.255.0 {
    option domain-name-servers 8.8.8.8, 1.1.1.1;
    option routers 172.16.199.1;
    include "/config/ipxe-metal.conf";
  }
}
Since we use a number of Ubiquiti EdgeRouter devices especially in our home test
networks, it is worth mentioning the curious syntax gymnastics we must go
through there.
Essentially, the quotes around the path need to be entered as HTML entities:
"e;.
Ubiquiti EdgeRouter configuration statement:
set service dhcp-server shared-network-name sidero \
subnet 172.16.199.1 \
subnet-parameters "include "e;/config/ipxe-metal.conf";"
Also note the fact that there are two semicolons at the end of the line;
the first is part of the HTML-encoded quote;
the second is the actual terminating semicolon.
Troubleshooting
Getting the netboot environment is tricky and debugging it is difficult.
Once running, it will generally stay running;
the problem is nearly always one of a missing or incorrect configuration, since
the process involves several different components.
We are working toward integrating as much as possible into Sidero, to provide as
much intelligence and automation as can be had, but until then, you will likely
need to figure out how to begin hunting down problems.
See the Sidero Troubleshooting guide for more assistance.
4 - Install Sidero
Install Sidero
Sidero is included as a default infrastructure provider in clusterctl, so the
installation of both Sidero and the Cluster API (CAPI) components is as simple
as using the clusterctl tool.
Note: Because Cluster API upgrades are stateless, it is important to keep all Sidero
configuration for reuse during upgrades.
Sidero has a number of configuration options which should be supplied at install
time, kept, and reused for upgrades.
These can also be specified in the clusterctl configuration file
($HOME/.cluster-api/clusterctl.yaml).
You can reference the clusterctl
docs
for more information on this.
For our purposes, we will use environment variables for our configuration
options.
export SIDERO_CONTROLLER_MANAGER_HOST_NETWORK=true
export SIDERO_CONTROLLER_MANAGER_API_ENDPOINT=192.168.1.150

clusterctl init -b talos -c talos -i sidero
First, we are telling Sidero to use hostNetwork: true so that it binds its
ports directly to the host, rather than being available only from inside the
cluster.
There are many ways of exposing the services, but this is the simplest
path for the single-node management cluster.
When you scale the management cluster, you will need to use an alternative
method, such as an external load balancer or something like
MetalLB.
The 192.168.1.150 IP address is the IP address or DNS hostname as seen from the workload
clusters.
In our case, this should be the main IP address of your Docker
workstation.
5 - Expose Sidero Services
A guide for bootstrapping Sidero management plane
If you built your cluster as specified in the [Prerequisite: Kubernetes] section in this tutorial, your services are already exposed and you can skip this section.
There are two external Services which Sidero serves and which much be made
reachable by the servers which it will be driving.
For most servers, TFTP (port 69/udp) will be needed.
This is used for PXE booting, both BIOS and UEFI.
Being a primitive UDP protocl, many load balancers do not support TFTP.
Instead, solutions such as MetalLB may be used to expose TFTP over a known IP address.
For servers which support UEFI HTTP Network Boot, TFTP need not be used.
The kernel, initrd, and all configuration assets are served from the HTTP service
(port 8081/tcp).
It is needed for all servers, but since it is HTTP-based, it
can be easily proxied, load balanced, or run through an ingress controller.
The main thing to keep in mind is that the services MUST match the IP or
hostname specified by the SIDERO_CONTROLLER_MANAGER_API_ENDPOINT environment
variable (or configuration parameter) when you installed Sidero.
It is a good idea to verify that the services are exposed as you think they
should be.
$ curl -I http://192.168.1.150:8081/tftp/ipxe.efi
HTTP/1.1 200 OK
Accept-Ranges: bytes
Content-Length: 1020416
Content-Type: application/octet-stream
6 - Import Workload Machines
A guide for bootstrapping Sidero management plane
At this point, any servers on the same network as Sidero should network boot from Sidero.
To register a server with Sidero, simply turn it on and Sidero will do the rest.
Once the registration is complete, you should see the servers registered with kubectl get servers:
$ kubectl get servers -o wide
NAME                                   HOSTNAME        ACCEPTED   ALLOCATED   CLEAN
00000000-0000-0000-0000-d05099d33360   192.168.1.201   false      false       false
Accept the Servers
Note in the output above that the newly registered servers are not accepted.
In order for a server to be eligible for consideration, it must be marked as accepted.
Before a Server is accepted, no write action will be performed against it.
This default is for safety (don’t accidentally delete something just because it
was plugged in) and security (make sure you know the machine before it is given
credentials to communicate).
Note: if you are running in a safe environment, you can configure Sidero to
automatically accept new machines.
For more information on server acceptance, see the server docs.
Create ServerClasses
By default, Sidero comes with a single ServerClass any which matches any
(accepted) server.
This is sufficient for this demo, but you may wish to have
more flexibility by defining your own ServerClasses.
ServerClasses allow you to group machines which are sufficiently similar to
allow for unnamed allocation.
This is analogous to cloud providers using such classes as m3.large or
c2.small, but the names are free-form and only need to make sense to you.
For more information on ServerClasses, see the ServerClass
docs.
Hardware differences
In baremetal systems, there are commonly certain small features and
configurations which are unique to the hardware.
In many cases, such small variations may not require special configurations, but
others do.
If hardware-specific differences do mandate configuration changes, we need a way
to keep those changes local to the hardware specification so that at the higher
level, a Server is just a Server (or a server in a ServerClass is just a Server
like all the others in that Class).
The most common variations seem to be the installation disk and the console
serial port.
Some machines have NVMe drives, which show up as something like /dev/nvme0n1.
Others may be SATA or SCSI, which show up as something like /dev/sda.
Some machines use /dev/ttyS0 for the serial console; others /dev/ttyS1.
Configuration patches can be applied to either Servers or ServerClasses, and
those patches will be applied to the final machine configuration for those
nodes without having to know anything about those nodes at the allocation level.
For examples of install disk patching, see the Installation Disk
doc.
For more information about patching in general, see the Patching
Guide.
7 - Create a Workload Cluster
Create a Workload Cluster
Once created and accepted, you should see the servers that make up your ServerClasses appear as “available”:
$ kubectl get serverclass
NAME      AVAILABLE                                  IN USE
any       ["00000000-0000-0000-0000-d05099d33360"]   []
Generate Cluster Manifests
We are now ready to generate the configuration manifest templates for our first workload
cluster.
There are several configuration parameters that should be set in order for the templating to work properly:
CONTROL_PLANE_ENDPOINT: The endpoint used for the Kubernetes API server (e.g. https://1.2.3.4:6443).
This is the equivalent of the endpoint you would specify in talosctl gen config.
There are a variety of ways to configure a control plane endpoint.
Some common ways for an HA setup are to use DNS, a load balancer, or BGP.
A simpler method is to use the IP of a single node.
This has the disadvantage of being a single point of failure, but it can be a simple way to get running.CONTROL_PLANE_SERVERCLASS: The server class to use for control plane nodes.WORKER_SERVERCLASS: The server class to use for worker nodes.KUBERNETES_VERSION: The version of Kubernetes to deploy (e.g. v1.21.1).CONTROL_PLANE_PORT: The port used for the Kubernetes API server (port 6443)
For instance:
export CONTROL_PLANE_SERVERCLASS=any
export WORKER_SERVERCLASS=any
export TALOS_VERSION=v0.10.3
export KUBERNETES_VERSION=v1.21.1
export CONTROL_PLANE_PORT=6443
export CONTROL_PLANE_ENDPOINT=1.2.3.4

clusterctl config cluster cluster-0 -i sidero > cluster-0.yaml
Take a look at this new cluster-0.yaml manifest and make any changes as you
see fit.
Feel free to adjust the replicas field of the TalosControlPlane and MachineDeployment objects to match the number of machines you want in your controlplane and worker sets, respecively.
MachineDeployment (worker) count is allowed to be 0.
Of course, these may also be scaled up or down after they have been created,
as well.
Create the Cluster
When you are satisfied with your configuration, go ahead and apply it to Sidero:
kubectl apply -f cluster-0.yaml
At this point, Sidero will allocate Servers according to the requests in the
cluster manifest.
Once allocated, each of those machines will be installed with Talos, given their
configuration, and form a cluster.
You can watch the progress of the Servers being selected:
watch kubectl --context=sidero-demo \
  get servers,machines,clusters
First, you should see the Cluster created in the Provisioning phase.
Once the Cluster is Provisioned, a Machine will be created in the
Provisioning phase.
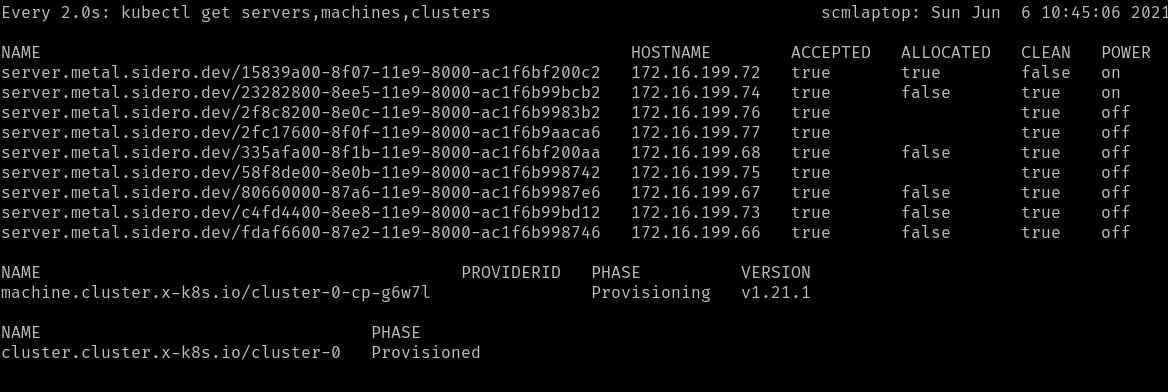
During the Provisioning phase, a Server will become allocated, the hardware
will be powered up, Talos will be installed onto it, and it will be rebooted
into Talos.
Depending on the hardware involved, this may take several minutes.
Eventually, the Machine should reach the Running phase.
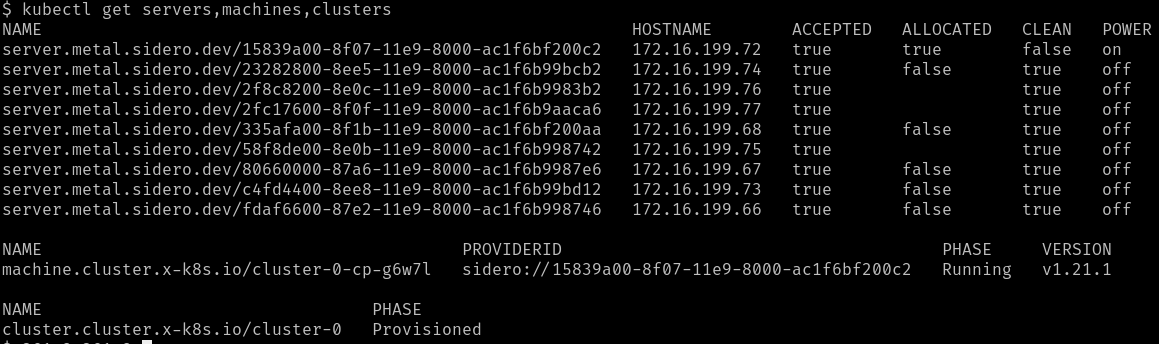
The initial controlplane Machine will always be started first.
Any additional nodes will be started after that and will join the cluster when
they are ready.
Retrieve the Talosconfig
In order to interact with the new machines (outside of Kubernetes), you will
need to obtain the talosctl client configuration, or talosconfig.
You can do this by retrieving the resource of the same type from the Sidero
management cluster:
kubectl --context=sidero-demo \
  get talosconfig \
  -l cluster.x-k8s.io/cluster-name=cluster-0 \
  -o jsonpath='{.items[0].status.talosConfig}' \
  > cluster-0-talosconfig.yaml
Retrieve the Kubeconfig
With the talosconfig obtained, the workload cluster’s kubeconfig can be retrieved in the normal Talos way:
talosctl --talosconfig cluster-0.yaml kubeconfig
Check access
Now, you should have two cluster available: you management cluster
(sidero-demo) and your workload cluster (cluster-0).
kubectl --context=sidero-demo get nodes
kubectl --context=cluster-0 get nodes
8 - Scale the Workload Cluster
A guide for bootstrapping Sidero management plane
If you have more machines available, you can scale both the controlplane
(TalosControlPlane) and the workers (MachineDeployment) for any cluster
after it has been deployed.
This is done just like normal Kubernetes Deployments.
kubectl scale taloscontrolplane cluster-0-cp --replicas=3
9 - Optional: Pivot management cluster
A guide for bootstrapping Sidero management plane
Having the Sidero cluster running inside a Docker container is not the most
robust place for it, but it did make for an expedient start.
Conveniently, you can create a Kubernetes cluster in Sidero and then pivot the
management plane over to it.
Start by creating a workload cluster as you have already done.
In this example, this new cluster is called management.
After the new cluster is available, install Sidero onto it as we did before,
making sure to set all the environment variables or configuration parameters for
the new management cluster first.
export SIDERO_CONTROLLER_MANAGER_API_ENDPOINT=sidero.mydomain.com

clusterctl init \
  --kubeconfig-context=management
  -i sidero -b talos -c talos
Now, you can move the database from sidero-demo to management:
clusterctl move \
  --kubeconfig-context=sidero-demo \
  --to-kubeconfig-context=management
Delete the old Docker Management Cluster
If you created your sidero-demo cluster using Docker as described in this
tutorial, you can now remove it:
talosctl cluster destroy --name sidero-demo
10 - Troubleshooting
Troubleshooting
The first thing to do in troubleshooting problems with the Sidero installation
and operation is to figure out where in the process that failure is occurring.
Keep in mind the general flow of the pieces.
For instance:
- A server is configured by its BIOS/CMOS to attempt a network boot using the PXE firmware on
its network card(s).
- That firmware requests network and PXE boot configuration via DHCP.
- DHCP points the firmware to the Sidero TFTP or HTTP server (depending on the firmware type).
- The second stage boot, iPXE, is loaded and makes an HTTP request to the
Sidero metadata server for its configuration, which contains the URLs for
the kernel and initrd images.
- The kernel and initrd images are downloaded by iPXE and boot into the Sidero
agent software (if the machine is not yet known and assigned by Sidero).
- The agent software reports to the Sidero metadata server via HTTP the hardware information of the machine.
- A (usually human or external API) operator verifies and accepts the new
machine into Sidero.
- The agent software reboots and wipes the newly-accepted machine, then powers
off the machine to wait for allocation into a cluster.
- The machine is allocated by Sidero into a Kubernetes Cluster.
- Sidero tells the machine, via IPMI, to boot into the OS installer
(following all the same network boot steps above).
- The machine downloads its configuration from the Sidero metadata server via
HTTP.
- The machine applies its configuration, installs a bootloader, and reboots.
- The machine, upon reboot from its local disk, joins the Kubernetes cluster
and continues until Sidero tells it to leave the cluster.
- Sidero tells the machine to leave the cluster and reboots it into network
boot mode, via IPMI.
- The machine netboots into wipe mode, wherein its disks are again wiped to
come back to the “clean” state.
- The machine again shuts down and waits to be needed.
Device firmware (PXE boot)
The worst place to fail is also, unfortunately, the most common.
This is the firmware phase, where the network card’s built-in firmware attempts
to initiate the PXE boot process.
This is the worst place because the firmware is completely opaque, with very
little logging, and what logging does appear frequently is wiped from the
console faster than you can read it.
If you fail here, the problem will most likely be with your DHCP configuration,
though it could also be in the Sidero TFTP service configuration.
Validate Sidero TFTP service
The easiest to validate is to use a tftp client to validate that the Sidero
TFTP service is available at the IP you are advertising via DHCP.
  $ atftp 172.16.199.50
  tftp> get ipxe.efi
TFTP is an old, slow protocol with very little feedback or checking.
Your only real way of telling if this fails is by timeout.
Over a local network, this get command should take a few seconds.
If it takes longer than 30 seconds, it is probably not working.
Success is also not usually indicated:
you just get a prompt returned, and the file should show up in your current
directory.
If you are failing to connect to TFTP, the problem is most likely with your
Sidero Service exposure:
how are you exposing the TFTP service in your management cluster to the outside
world?
This normally involves either setting host networking on the Deployment or
installing and using something like MetalLB.